


I was thinking, and I have some time on my hands at the moment while the knees that Sawbones fixed a few weeks ago are healing – which they are doing extremely well.
Here is the scenario I was thinking about.
You have a limited budget of about R1400, or you don’t want to spend much more than that until you have “put a foot” in the GPS world.
You have, and you are reasonably competent with a Windows PC. You can use Google Earth, Google maps. You know how to download software to, and install stuff on your PC. You can use Google and find stuff on the Web, and you don’t have a mental aversion to reading the odd help file if you need to.
You remember some of your geography lessons from school, you can read a paper map, and you know what Latitude and Longitude are.
Can you make use of a GPS to help you with the sport of riding a dual sport motorbike?
I say the answer is yes. There will be a lot of things you can’t do, such as auto-routing to a location (such as the Tupperware party ) and seeing your position on a GPS map as you ride along, but you can still use a GPS to help you, and I say you should be able to do the following:-
1. Find where you are on a paper map.
2. Record the position of something interesting or beautiful so that your mates can find it at a later date.
3. Find your way to a published position(or waypoint)
4. Record a track you have ridden, view it in Google Earth (or Google Maps), clean it up and publish it here on the forum for your mates to ride.
5. View a track you rode or that you will be riding on a map background on your PC.
6. Plan a route or track using Google Earth, load it into the GPS, and then go ride.
7. Keep a library of ridden tracks, and pull out a track for you or a friend to ride at a later date.
8. Download tracks published on the forum or emailed to you by the organizers of a festival or meet, and then go and ride them.
So what do you get?
You get an entry level non-mapping GPS – something like a Foretrex 301 or an eTrex 10 (which I have not yet seen as it is due for release, but I suspect it will be in the budget price range.) I have based this post on a ForeTrex 301 because I have one and I have tested all the above.
What you DO NOT GET is a GPS like an entry level TOM TOM or Nuvi, or one of the el cheepo Chinese jobbies with road maps but limited upload/download or track recording features. They are not for our game.
You get something like this:-
See https://www.techshop.co.za/ProductInfo.aspx?ItemId=1085
R1 200-R1 300 does not get you a fancy looking GPS. The ForeTrex301 has a tiny monochrome screen, it cannot display maps, but trust me, it’s little screen works great on a bike for showing waypoints and for navigating tracks. Without a PC at home to upload and download stuff this little GPS is next to useless, but with a PC, some software, and a few skills you can do wonders with it.
You need some software. There are probably many bits of software out there that will enable you to do the above things, but I will cover the things I personally use.
Download the free version of GPSTrackmaker – this will enable you to view edit, merge and filter tracks and keep a library of GPS stuff.
https://www.gpstm.com/dwlpage.php
Download the USB drivers for the GPS from Garmin so that GPStrackmaker will be able to upload and download to the device at:-
https://www8.garmin.com/support/download_details.jsp?id=591
(You may not need to, but it’s always a good idea to get the newest drivers)
Get free Google Earth from:-
https://www.google.com/earth/download/ge/
Download free WinGDB (a useful small file conversion utility) from :-
https://www.sackman.info/
You will also need a road atlas – last time I looked they were about R75 at CNA. If you buy an atlas or maps make sure they are based on the WGS84 coordinate system as that is the system GPS devices most commonly use.
So now you have a budget, but powerful toolkit for the tasks at hand. What we don’t have is a set of maps either on the GPS or on the PC , but to get that we would need to spend another grand or so and that would blow our budget, but we can still do a lot.
1. Find where you are on a paper map.
There are a few ways to do this, but the simplest is to press the “mark” button on the GPS, and this will pop up a small screen showing you the current location and allow you to save the position as a waypoint. With the lat and lon we can find our position in the map book by looking at the grid markings – Lat in the up/down direction and lon in the left/right direction.
You can also navigate roughly by waypoint triangulation. The Foretrex has a screen that will show you a list of the waypoints closest to your current position and the distance and direction each waypoint, and if these waypoints appear on a paper map you can use this to work out roughly where you are.
I get bored in aircraft and sometimes load the towns along the route and alleviate the boredom by watching the list rearrange itself as the distance and direction to the towns on the ground changes as the plane flies along. The nice think about my little ForeTrex is that it does not look like an “electronic device” so the flight attendants don’t come and tell me to switch it off. How did I get waypoints of the towns into the GPS? From MapSource, but I could have done it with Google Earth.
2. Record the position of something interesting or beautiful so that your mates can find it at a later date.
As per number 1. Just press the “mark” button on the GPS and this will record a waypoint in the GPS device, and then we can see it, and it’s position when we download from the GPS to the PC when we get home.
I have a collection of waypoints I have built up over the years, and out there I record the positions of shebeens, scenic places and out-of-the way petrol availability.
3. Find your way to a published position(or waypoint)
Unfortunately this is not that easy with a budget, non-mapping GPS. With my Garmin 62s I just put in the lat lon of the point I wish to get to, and as it has routable maps installed in it not only will it show me where the destination point is, but it will show me a way to get there.
With a non-mapping GPS like the ForeTrex 301 all you can see is the direction and distance to the destination. It can’t tell you if there is a dam or mountain between your location and the destination, and it leaves you to have to find a way there.
But knowing the direction and distance is a big help for someone directionally challenged like me, and especially in a places like the Valley of 1000 hills, which is a rabbit warren of roads and tracks and if the sun is not shining you can easily find yourself chasing your own tail and ride around in circles for hours like the legendary fakawe bird. .
A few years ago I went on a three week course in Cheltenham in the U.K., and in the Northern hemisphere the sun is always on the wrong side and I get seriously disoriented. Having the little ForeTrex in my pocket was great. It had no maps but I waypointed the pub, the pool, the B&B where I was staying and the client’s offices, so I always knew where I was, but not always how to get where I wanted to be.
4. Record a track you have ridden, view it in Google Earth (or Google Maps), clean it up and publish it here on the forum for your mates to ride.
The Garmin ForeTrex and eTrex range have a tracklog of 10 000 points which is enough to record a couple of days of riding in memory. When you get back to your PC just download the tracks and waypoints using GPSTrackmaker. Should you want to see where you went in Google Earth simply highlight the track you want to see and use View-> View in Google Earth. It will open Google Earth and show you where you rode.
GPSTrackmaker has fairly decent track editing and filtering capability. You can use it to:-
- Join track segments.
- Cut and splice track segments
- Edit out loops and back-tracks
- Reduce the number of track points in a tracklog. GPStrackmaker calls this a “tracklog reducer”
- View an “altitude profile” – view the hills and valleys you rode.
5. View a track you rode or that you will be riding on a map background on your PC.
To do this we need to jump through a few hoops. Our budget will not allow us to buy a map set like Garmin Topo and Rec maps (+- R1 100) or Tracks4Africa (+- R800).
But GPS TrackMaker does have the capability of importing scanned paper maps and using them as a background so that you can see the tracks and waypoints on a map. The version I am using even takes it a step further and allows you to view a track against a background of a map from Google Maps.
Open a new session of GPSTrackmaker, open the track you want to view in Google maps, get it central in the view window and click “View” -> “Google Maps”. This will open a new window with Google Maps of the area in it. If you click the “transfer” button it will take a screen-dump of this display and transfer it as a background map to GPSTrackmaker so that you can see your tracks against a Google Maps background.
(The free version of GPSTrackmaker only allows you to transfer one background per session, but you can save it as a .GTM file, open a new session of GPSTrackmaker, repeat the operation with another view, and then use the “File” -> “Merge” to create a new file that has the two (or more) background images “tiled” as a background.
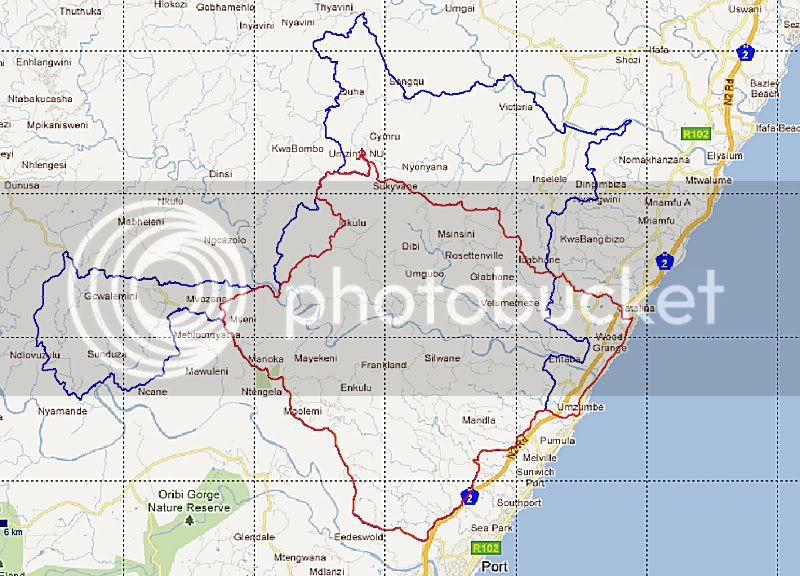
The following was created this way and shows a track from my little Foretrex301 that I strapped onto Jon’s (Noble Steed’s) handlebars to record the BOBZ ride on Oct 29 (blue) as well as the track from my 62s in my Soob Forester (red) against a Google Maps background. I admit it is not pretty, but to create a map to show your mates where you went it is workable.
If you want to see a few more details you can get hold of the 1:50 000 Maps and import them and use them as background in GPSTrackmaker. The maps are available on a CD from Chief Directorate: National Geo-spatial Information and if I remember right they are quite cheap:-
https://www.ngi.gov.za
I have never seen the data on CD, but I know a few guys have the maps and use them. I think you have to jump through a few hoops to convert them to an image format (GIF, JPEG) to use them as a background image in GPSTrackmaker.
I did find a website where you can download the maps as JPEG images at :-
https://www.spatialreference.co.za/
. . .but there seems to be a limit of downloading only 5 maps a month. I downloaded the maps of the Valley of 1000 Hills, imported them into GPSTrackmaker, and lined them up (it’s quite a task) and imported some tracks from my library to get the following:-

Not bad, but I am concerned that the data on these maps is getting a bit old, and sometimes not all that accurate. The bridge over the Mgeni below the dam wall is not shown and I have been over that bridge for the last 15 years.
I have the “glovebox” (A5 size) map book and scanned the South Coast as a background for the BOBZ ride and it comes out like this.

It shows you not much more than the area we rode/drove, and is clearly not detailed enough for navigation. Also the map makers took liberties with their placement of the N3 and R102 – I think they do that for clarity.
6. Plotting a route in Google Earth and then riding it.
The bad news here is that the process can be quite tedious, but the good news is it is quite easy. The method has been covered in quite a few threads here on the forum so I won’t go into detail save to outline the process I follow:-
a. Open Google Earth and in the “places” pane right-click “my places and add a folder and give it a name. This is so that if I add a number of tracks and locations (waypoints) I can just export the whole folder into a file.
b. Highlight the new folder and press the “add place” button to create a new waypoint, or “add path” button to add a track you wish to ride into the folder.
c. When finished right-click the folder, select “save place as” and then save it to disk as a “.KML” file – Google Earth Format
d. Open the KML file created in GPSTrackmaker. You can now edit the tracks and waypoints if you need to and load them into the GPS and go ride.
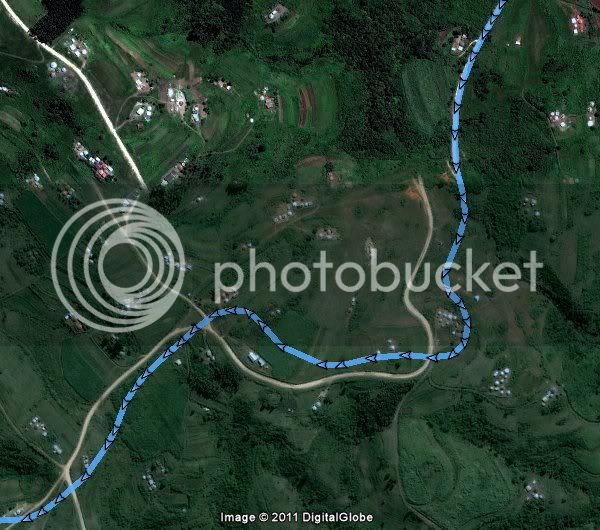
Caution :- The “tiles” in Google Earth are not always perfectly georeferenced, or aligned, with the actual lat/lon positions out there. Most are accurate to a few meters. But there is one “tile” in the Adams Mission area of KZN that is about 100m misplaced. See Below. The top tile is perfectly aligned, but the bottom one is shifted about 75m South West.
7. Keep a library of ridden tracks, and pull out a track for you or a friend to ride at a later date.
Upload the ridden track from the GPS and save it to a directory folder. I use a convention and save the tracks with a name like 20111007KznMkomaziValley.GTM – makes it easier for me to find.
A nice thing about GPSTrackmaker is that it allows you to merge multiple files together. You can do this two ways – by opening multiple files using File -> Open and then highlighting multiple files, or by opening one file and then using File -> Merge to open the second and subsequent files. I have a single GTM file containing all the tracks I rode on my ole KLE, and another of all the tracks I have ridden on the Tenere so far.
To get a single track from a consolidated library you can double-click it, open another GPSTrackmaker session and paste it in that session.
8. Download tracks published on the forum or emailed to you by the organizers of a festival or meet, and then go and ride them.
If the tracks for the festival are published as a XML file you can open the file directly in GPStrackmaker and load to the GPS, but if the tracks are published as a GDB file (Garmin’s native format) you will have to convert the format from GDB to a format that GPSTrackmaker can read. The easiest way to do this is to ask the person who published or provided the tracks to give you a copy in GPX Format that you can load. Failing this there is a free tool available called GPSbabel – get it at:-
https://www.gpsbabel.org/
It’s quite simple to use. Just open the file as GDB, and save it as GPX. You can then open the GPX file with GPSTrackmaker, edit and “reduce” if needed, and load the stuff to the GPS.
Closing comments:-
There are probably many, and probably easier, ways to do many of the things I have outlined above, but I outlined things I personally do.
And why would I use a little ForeTrex when I have a Garmin 62S, which to me is one of the best GPS' out there for our sport? The answer is that they both have a place in my life. If I need to find 275 Sydney Road, Durban then the 62s will do it, but if I am riding a pre-planned track through the Valley of 1000 hills I will use the ForeTrex as a single thick black line on a uncluttered screen is a little easier to navigate on than the 62S’s busy maps.
And to be honest I like fiddling with things and seeing what they can do.
And there is nothing I outlined above that I can’t do with the 62S, but there are things above that you can’t do with most of the Nuvis, and are not easy with some of the Zumos.
Here is the scenario I was thinking about.
You have a limited budget of about R1400, or you don’t want to spend much more than that until you have “put a foot” in the GPS world.
You have, and you are reasonably competent with a Windows PC. You can use Google Earth, Google maps. You know how to download software to, and install stuff on your PC. You can use Google and find stuff on the Web, and you don’t have a mental aversion to reading the odd help file if you need to.
You remember some of your geography lessons from school, you can read a paper map, and you know what Latitude and Longitude are.
Can you make use of a GPS to help you with the sport of riding a dual sport motorbike?
I say the answer is yes. There will be a lot of things you can’t do, such as auto-routing to a location (such as the Tupperware party ) and seeing your position on a GPS map as you ride along, but you can still use a GPS to help you, and I say you should be able to do the following:-
1. Find where you are on a paper map.
2. Record the position of something interesting or beautiful so that your mates can find it at a later date.
3. Find your way to a published position(or waypoint)
4. Record a track you have ridden, view it in Google Earth (or Google Maps), clean it up and publish it here on the forum for your mates to ride.
5. View a track you rode or that you will be riding on a map background on your PC.
6. Plan a route or track using Google Earth, load it into the GPS, and then go ride.
7. Keep a library of ridden tracks, and pull out a track for you or a friend to ride at a later date.
8. Download tracks published on the forum or emailed to you by the organizers of a festival or meet, and then go and ride them.
So what do you get?
You get an entry level non-mapping GPS – something like a Foretrex 301 or an eTrex 10 (which I have not yet seen as it is due for release, but I suspect it will be in the budget price range.) I have based this post on a ForeTrex 301 because I have one and I have tested all the above.
What you DO NOT GET is a GPS like an entry level TOM TOM or Nuvi, or one of the el cheepo Chinese jobbies with road maps but limited upload/download or track recording features. They are not for our game.
You get something like this:-
See https://www.techshop.co.za/ProductInfo.aspx?ItemId=1085
R1 200-R1 300 does not get you a fancy looking GPS. The ForeTrex301 has a tiny monochrome screen, it cannot display maps, but trust me, it’s little screen works great on a bike for showing waypoints and for navigating tracks. Without a PC at home to upload and download stuff this little GPS is next to useless, but with a PC, some software, and a few skills you can do wonders with it.
You need some software. There are probably many bits of software out there that will enable you to do the above things, but I will cover the things I personally use.
Download the free version of GPSTrackmaker – this will enable you to view edit, merge and filter tracks and keep a library of GPS stuff.
https://www.gpstm.com/dwlpage.php
Download the USB drivers for the GPS from Garmin so that GPStrackmaker will be able to upload and download to the device at:-
https://www8.garmin.com/support/download_details.jsp?id=591
(You may not need to, but it’s always a good idea to get the newest drivers)
Get free Google Earth from:-
https://www.google.com/earth/download/ge/
Download free WinGDB (a useful small file conversion utility) from :-
https://www.sackman.info/
You will also need a road atlas – last time I looked they were about R75 at CNA. If you buy an atlas or maps make sure they are based on the WGS84 coordinate system as that is the system GPS devices most commonly use.
So now you have a budget, but powerful toolkit for the tasks at hand. What we don’t have is a set of maps either on the GPS or on the PC , but to get that we would need to spend another grand or so and that would blow our budget, but we can still do a lot.
1. Find where you are on a paper map.
There are a few ways to do this, but the simplest is to press the “mark” button on the GPS, and this will pop up a small screen showing you the current location and allow you to save the position as a waypoint. With the lat and lon we can find our position in the map book by looking at the grid markings – Lat in the up/down direction and lon in the left/right direction.
You can also navigate roughly by waypoint triangulation. The Foretrex has a screen that will show you a list of the waypoints closest to your current position and the distance and direction each waypoint, and if these waypoints appear on a paper map you can use this to work out roughly where you are.
I get bored in aircraft and sometimes load the towns along the route and alleviate the boredom by watching the list rearrange itself as the distance and direction to the towns on the ground changes as the plane flies along. The nice think about my little ForeTrex is that it does not look like an “electronic device” so the flight attendants don’t come and tell me to switch it off. How did I get waypoints of the towns into the GPS? From MapSource, but I could have done it with Google Earth.
2. Record the position of something interesting or beautiful so that your mates can find it at a later date.
As per number 1. Just press the “mark” button on the GPS and this will record a waypoint in the GPS device, and then we can see it, and it’s position when we download from the GPS to the PC when we get home.
I have a collection of waypoints I have built up over the years, and out there I record the positions of shebeens, scenic places and out-of-the way petrol availability.
3. Find your way to a published position(or waypoint)
Unfortunately this is not that easy with a budget, non-mapping GPS. With my Garmin 62s I just put in the lat lon of the point I wish to get to, and as it has routable maps installed in it not only will it show me where the destination point is, but it will show me a way to get there.
With a non-mapping GPS like the ForeTrex 301 all you can see is the direction and distance to the destination. It can’t tell you if there is a dam or mountain between your location and the destination, and it leaves you to have to find a way there.
But knowing the direction and distance is a big help for someone directionally challenged like me, and especially in a places like the Valley of 1000 hills, which is a rabbit warren of roads and tracks and if the sun is not shining you can easily find yourself chasing your own tail and ride around in circles for hours like the legendary fakawe bird. .
A few years ago I went on a three week course in Cheltenham in the U.K., and in the Northern hemisphere the sun is always on the wrong side and I get seriously disoriented. Having the little ForeTrex in my pocket was great. It had no maps but I waypointed the pub, the pool, the B&B where I was staying and the client’s offices, so I always knew where I was, but not always how to get where I wanted to be.
4. Record a track you have ridden, view it in Google Earth (or Google Maps), clean it up and publish it here on the forum for your mates to ride.
The Garmin ForeTrex and eTrex range have a tracklog of 10 000 points which is enough to record a couple of days of riding in memory. When you get back to your PC just download the tracks and waypoints using GPSTrackmaker. Should you want to see where you went in Google Earth simply highlight the track you want to see and use View-> View in Google Earth. It will open Google Earth and show you where you rode.
GPSTrackmaker has fairly decent track editing and filtering capability. You can use it to:-
- Join track segments.
- Cut and splice track segments
- Edit out loops and back-tracks
- Reduce the number of track points in a tracklog. GPStrackmaker calls this a “tracklog reducer”
- View an “altitude profile” – view the hills and valleys you rode.
5. View a track you rode or that you will be riding on a map background on your PC.
To do this we need to jump through a few hoops. Our budget will not allow us to buy a map set like Garmin Topo and Rec maps (+- R1 100) or Tracks4Africa (+- R800).
But GPS TrackMaker does have the capability of importing scanned paper maps and using them as a background so that you can see the tracks and waypoints on a map. The version I am using even takes it a step further and allows you to view a track against a background of a map from Google Maps.
Open a new session of GPSTrackmaker, open the track you want to view in Google maps, get it central in the view window and click “View” -> “Google Maps”. This will open a new window with Google Maps of the area in it. If you click the “transfer” button it will take a screen-dump of this display and transfer it as a background map to GPSTrackmaker so that you can see your tracks against a Google Maps background.
(The free version of GPSTrackmaker only allows you to transfer one background per session, but you can save it as a .GTM file, open a new session of GPSTrackmaker, repeat the operation with another view, and then use the “File” -> “Merge” to create a new file that has the two (or more) background images “tiled” as a background.
The following was created this way and shows a track from my little Foretrex301 that I strapped onto Jon’s (Noble Steed’s) handlebars to record the BOBZ ride on Oct 29 (blue) as well as the track from my 62s in my Soob Forester (red) against a Google Maps background. I admit it is not pretty, but to create a map to show your mates where you went it is workable.
If you want to see a few more details you can get hold of the 1:50 000 Maps and import them and use them as background in GPSTrackmaker. The maps are available on a CD from Chief Directorate: National Geo-spatial Information and if I remember right they are quite cheap:-
https://www.ngi.gov.za
I have never seen the data on CD, but I know a few guys have the maps and use them. I think you have to jump through a few hoops to convert them to an image format (GIF, JPEG) to use them as a background image in GPSTrackmaker.
I did find a website where you can download the maps as JPEG images at :-
https://www.spatialreference.co.za/
. . .but there seems to be a limit of downloading only 5 maps a month. I downloaded the maps of the Valley of 1000 Hills, imported them into GPSTrackmaker, and lined them up (it’s quite a task) and imported some tracks from my library to get the following:-
Not bad, but I am concerned that the data on these maps is getting a bit old, and sometimes not all that accurate. The bridge over the Mgeni below the dam wall is not shown and I have been over that bridge for the last 15 years.
I have the “glovebox” (A5 size) map book and scanned the South Coast as a background for the BOBZ ride and it comes out like this.
It shows you not much more than the area we rode/drove, and is clearly not detailed enough for navigation. Also the map makers took liberties with their placement of the N3 and R102 – I think they do that for clarity.
6. Plotting a route in Google Earth and then riding it.
The bad news here is that the process can be quite tedious, but the good news is it is quite easy. The method has been covered in quite a few threads here on the forum so I won’t go into detail save to outline the process I follow:-
a. Open Google Earth and in the “places” pane right-click “my places and add a folder and give it a name. This is so that if I add a number of tracks and locations (waypoints) I can just export the whole folder into a file.
b. Highlight the new folder and press the “add place” button to create a new waypoint, or “add path” button to add a track you wish to ride into the folder.
c. When finished right-click the folder, select “save place as” and then save it to disk as a “.KML” file – Google Earth Format
d. Open the KML file created in GPSTrackmaker. You can now edit the tracks and waypoints if you need to and load them into the GPS and go ride.
Caution :- The “tiles” in Google Earth are not always perfectly georeferenced, or aligned, with the actual lat/lon positions out there. Most are accurate to a few meters. But there is one “tile” in the Adams Mission area of KZN that is about 100m misplaced. See Below. The top tile is perfectly aligned, but the bottom one is shifted about 75m South West.
7. Keep a library of ridden tracks, and pull out a track for you or a friend to ride at a later date.
Upload the ridden track from the GPS and save it to a directory folder. I use a convention and save the tracks with a name like 20111007KznMkomaziValley.GTM – makes it easier for me to find.
A nice thing about GPSTrackmaker is that it allows you to merge multiple files together. You can do this two ways – by opening multiple files using File -> Open and then highlighting multiple files, or by opening one file and then using File -> Merge to open the second and subsequent files. I have a single GTM file containing all the tracks I rode on my ole KLE, and another of all the tracks I have ridden on the Tenere so far.
To get a single track from a consolidated library you can double-click it, open another GPSTrackmaker session and paste it in that session.
8. Download tracks published on the forum or emailed to you by the organizers of a festival or meet, and then go and ride them.
If the tracks for the festival are published as a XML file you can open the file directly in GPStrackmaker and load to the GPS, but if the tracks are published as a GDB file (Garmin’s native format) you will have to convert the format from GDB to a format that GPSTrackmaker can read. The easiest way to do this is to ask the person who published or provided the tracks to give you a copy in GPX Format that you can load. Failing this there is a free tool available called GPSbabel – get it at:-
https://www.gpsbabel.org/
It’s quite simple to use. Just open the file as GDB, and save it as GPX. You can then open the GPX file with GPSTrackmaker, edit and “reduce” if needed, and load the stuff to the GPS.
Closing comments:-
There are probably many, and probably easier, ways to do many of the things I have outlined above, but I outlined things I personally do.
And why would I use a little ForeTrex when I have a Garmin 62S, which to me is one of the best GPS' out there for our sport? The answer is that they both have a place in my life. If I need to find 275 Sydney Road, Durban then the 62s will do it, but if I am riding a pre-planned track through the Valley of 1000 hills I will use the ForeTrex as a single thick black line on a uncluttered screen is a little easier to navigate on than the 62S’s busy maps.
And to be honest I like fiddling with things and seeing what they can do.
And there is nothing I outlined above that I can’t do with the 62S, but there are things above that you can’t do with most of the Nuvis, and are not easy with some of the Zumos.