


ianhogg
Race Dog
- Joined
- Apr 24, 2010
- Messages
- 1,506
- Reaction score
- 23
- Location
- 34 Stanbury Street, Proserpine, QLD
- Bike
- Kawasaki Versys
Suzuki DR650 Seat and screen.
The DR650 is a great compromise but it does fall down on two issues, bottom comfort and rider protection. Both are easily solved.
THE SEAT
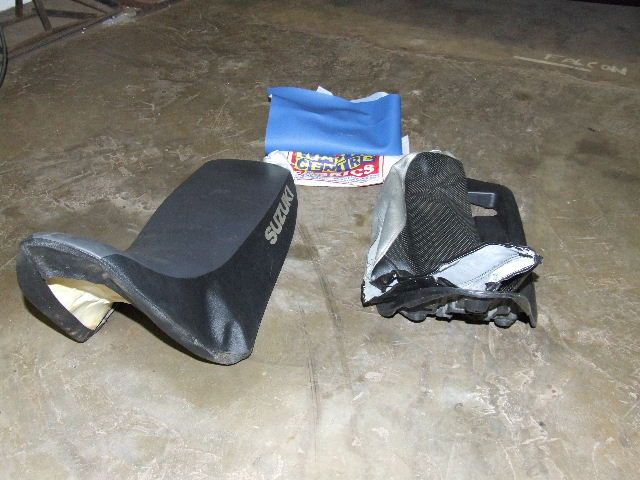
This seat is like the seat on my enduro bikes. Thin & hard. That’s OK if you are standing and your range is only 100km. I’ve tried things on top like the Seat Saint which does help but moves around but the basic problem is the seat is too narrow and too hard. Not all seats are miserable and some are just divine, take as an example the seat on your average ATV. Now, when an ATV goes to heaven, the part which gets left behind is the seat. Bike breakers, Chinese bike shops are full of them. The one in the picture below I got from Taz Motors in Umbilo Rd for R150.
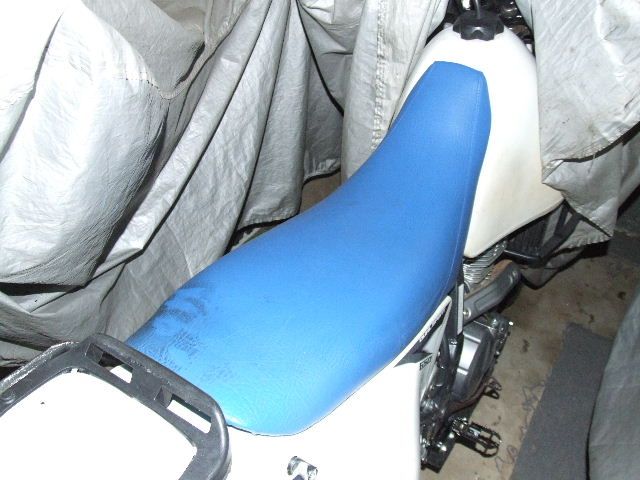
The Holy Grail is to find a complete DR seat and base to practice on. That won’t happen. I removed the O/E seat from its base and set the ATV foam on top. I usually recover my enduro bike seat covers myself with vinyl from the Waste Center as they are soon torn again but as this was a bit tricky I took it to an upholsterer. The one I used was Johnny/Shay at Mike Treasure Motors, 130 Crompton St, Pinetown, 031 701 7370. He charged me R250 and he also gave me another similar seat that a customer hadn’t collected. Bonus! At the end of this you should have a nice wide seat like you see below which will support the larger bum for a long period of time without discomfort. A couple of weeks ago I did a 320km morning ride without being aware of my bum at all. At first it was a bit weird to have the seat pressing on your inside leg when you stop and put your feet down at traffic lights but I soon got used to the feeling.
THE SCREEN
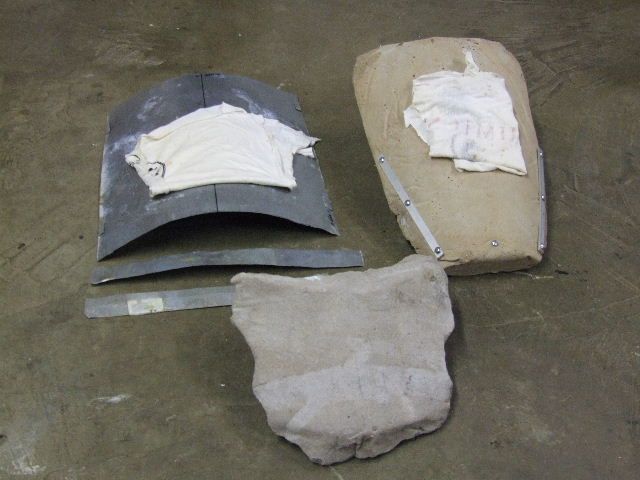
The next issue is weather protection. For getting somewhere on tar or just for snotty weather your life is made much easier with something in front of you. It is also handy to be able to take it off when you are doing the nice stuff & put it in your backpack. You can do all these things with a screen mounted on the headlamp fairing. I made 4 holes which can be used with a plastic number plate bolt or a cable tie. I also used some 20mm conduit tubing to stabilize it on the handlebars but you don’t really have to. When I first started doing these I used acrylic/Perspex as it was cheap and easy to bend with a hairdryer. However, it will break and I’m told it can shatter into some really sharp shards. Now I use polycarbonate as it is the same price and won’t shatter or craze. However, it is much more difficult to work as its plastic temperature is in the low 150’sC and the water content bubbles up causing white patches. The answer is to heat the whole thing up in your oven to 150C then increase in increments until you can lift it like pastry. Use gloves. A former helps. For the DR something simple like in the picture below left is all you need. I made it by mixing up a mud pie in the garden, pushing the headlamp surround into it and the pouring a mix of cement & sand into the indentation. The road bike one on the right is a bit more complicated, to line up existing screw holes you need to put screws with rawl plugs into the mounting holes of your sample and then pour upside down with wire strengtheners inserted into the body. There are some quite big stresses and polycarbonate shrinks quite a few percent on cooling so take it off when it is cold. Hint: use wood rawl plugs, the nylon ones melt! To start with I just took the sheet out the oven like a wet towel and draped it over the former and whatever kitchen pots looked the right shape. Now I use the metal plate you see in the picture bent to the curvature I want on the screen and do the whole thing in the oven. It is easier to cut the shape with a jig saw while the sheet is flat. Remember for the complicated road bike ones to measure on the OUTSIDE of the curvature.
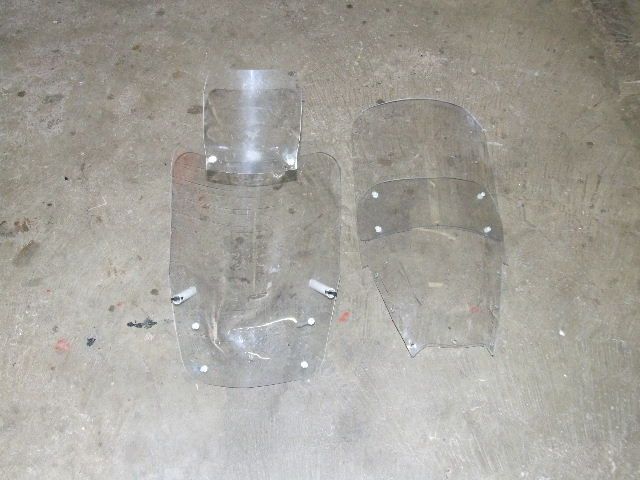
Once you have done this you should finish up with screens like you see below. The DR screen is made from 550x420x3mm poly carbonate sheet from Maizey plastics in Pinetown or Springfield Park and will cost about R60. I’m sure the next question on your lips is 1) why are they in two parts and 2) what’s the stupid bit on the top for! Answers are 1) that is how big the oven is and 2) when you ride you need screens at different heights. You always want to see over the screen but when you are on tar you look at the vanishing point/horizon while on a dirt road you also want to scan the road about 20m ahead. The removable piece allows you to have the best of both and the road bike screen will slide up and down in increments as required. A small difference in size or shape can have an enormous difference in the buffeting and wind noise in your helmet so it is worthwhile trying a few shapes and sizes. Cardboard will do as a test sheet. Remember when you put on a pillion that your bike will sag slightly making your perfect screen too tall!
The DR650 is a great compromise but it does fall down on two issues, bottom comfort and rider protection. Both are easily solved.
THE SEAT
This seat is like the seat on my enduro bikes. Thin & hard. That’s OK if you are standing and your range is only 100km. I’ve tried things on top like the Seat Saint which does help but moves around but the basic problem is the seat is too narrow and too hard. Not all seats are miserable and some are just divine, take as an example the seat on your average ATV. Now, when an ATV goes to heaven, the part which gets left behind is the seat. Bike breakers, Chinese bike shops are full of them. The one in the picture below I got from Taz Motors in Umbilo Rd for R150.

The Holy Grail is to find a complete DR seat and base to practice on. That won’t happen. I removed the O/E seat from its base and set the ATV foam on top. I usually recover my enduro bike seat covers myself with vinyl from the Waste Center as they are soon torn again but as this was a bit tricky I took it to an upholsterer. The one I used was Johnny/Shay at Mike Treasure Motors, 130 Crompton St, Pinetown, 031 701 7370. He charged me R250 and he also gave me another similar seat that a customer hadn’t collected. Bonus! At the end of this you should have a nice wide seat like you see below which will support the larger bum for a long period of time without discomfort. A couple of weeks ago I did a 320km morning ride without being aware of my bum at all. At first it was a bit weird to have the seat pressing on your inside leg when you stop and put your feet down at traffic lights but I soon got used to the feeling.

THE SCREEN
The next issue is weather protection. For getting somewhere on tar or just for snotty weather your life is made much easier with something in front of you. It is also handy to be able to take it off when you are doing the nice stuff & put it in your backpack. You can do all these things with a screen mounted on the headlamp fairing. I made 4 holes which can be used with a plastic number plate bolt or a cable tie. I also used some 20mm conduit tubing to stabilize it on the handlebars but you don’t really have to. When I first started doing these I used acrylic/Perspex as it was cheap and easy to bend with a hairdryer. However, it will break and I’m told it can shatter into some really sharp shards. Now I use polycarbonate as it is the same price and won’t shatter or craze. However, it is much more difficult to work as its plastic temperature is in the low 150’sC and the water content bubbles up causing white patches. The answer is to heat the whole thing up in your oven to 150C then increase in increments until you can lift it like pastry. Use gloves. A former helps. For the DR something simple like in the picture below left is all you need. I made it by mixing up a mud pie in the garden, pushing the headlamp surround into it and the pouring a mix of cement & sand into the indentation. The road bike one on the right is a bit more complicated, to line up existing screw holes you need to put screws with rawl plugs into the mounting holes of your sample and then pour upside down with wire strengtheners inserted into the body. There are some quite big stresses and polycarbonate shrinks quite a few percent on cooling so take it off when it is cold. Hint: use wood rawl plugs, the nylon ones melt! To start with I just took the sheet out the oven like a wet towel and draped it over the former and whatever kitchen pots looked the right shape. Now I use the metal plate you see in the picture bent to the curvature I want on the screen and do the whole thing in the oven. It is easier to cut the shape with a jig saw while the sheet is flat. Remember for the complicated road bike ones to measure on the OUTSIDE of the curvature.

Once you have done this you should finish up with screens like you see below. The DR screen is made from 550x420x3mm poly carbonate sheet from Maizey plastics in Pinetown or Springfield Park and will cost about R60. I’m sure the next question on your lips is 1) why are they in two parts and 2) what’s the stupid bit on the top for! Answers are 1) that is how big the oven is and 2) when you ride you need screens at different heights. You always want to see over the screen but when you are on tar you look at the vanishing point/horizon while on a dirt road you also want to scan the road about 20m ahead. The removable piece allows you to have the best of both and the road bike screen will slide up and down in increments as required. A small difference in size or shape can have an enormous difference in the buffeting and wind noise in your helmet so it is worthwhile trying a few shapes and sizes. Cardboard will do as a test sheet. Remember when you put on a pillion that your bike will sag slightly making your perfect screen too tall!
