


- Joined
- Feb 6, 2006
- Messages
- 10,577
- Reaction score
- 4,188
- Location
- Cape Town, deep in the lentils
- Bike
- KTM 990 Adventure
Shamelessly stolen from Gregor, a fellow from ADVrider and professional photographer....
https://www.advrider.com/forums/showpost.php?p=10785151&postcount=274
So I’ve gotten a lot of compliments and a few PM’s about my photography and I really appreciate it. I’ve been a professional photographer for my whole life and I still love the craft as there’s always something to learn. A lot have asked for advice or a book or primer to help with your own photography and while I don’t know of a good book I can offer some basic advice so here you go:
Photography is a lot like comedy and real estate: location, location, location and...
...timing!
Okay that's true but more than anything the point of photography is to tell a story. Story telling is how we communicate our world or our experience and stories can be told many ways; simply, as fiction, with great embellishment or to just get the point across. Photography is the same.
Just like a story the fundamentals are sort of important but once mastered become rather automatic. Spelling or the lack of it can really hamper a story not because of a “rule” but because it ruins the rhythm of a sentence. The equivalent is exposure for photography. The good news, like spell check, is that the current cameras, for all intents and purposes, take care of this for you. It’s a misconception that pros hate auto exposure - when we can use it we do. As an example I shot this whole trip on “program” with few exceptions.
The next most basic thing after exposure is focus which is like grammar - again the cameras take care of this for you but there’s also room for creativity. When I started shooting focus was a difficult technique to master and I used to sit by the side of the road and “follow focus” on cars for hours on end to hone my technique. Now there’s no person that can focus faster or more accurately than the cameras can. Like all technology though you should learn to make it work for you rather than against you. All cameras have a mode that allows you to half press to lock the focus on the center and then hold that half press and recompose - learn that trick and use it or even better just try manual for a while.
If your camera has the ability to vary the aperture and shutter speed this allows a lot of control and creativity. Three elements control focus and exposure. Aperture is the opening of the lens and controls how much things are in focus - a lot or a little. Shutter speed is the length of time the shutter is open and also controls the amount of blur. ISO is the sensitivity to light of the camera and the three are intertwined so that each one affects the other. You don’t have to know a lot about them but a little will help. First let’s look at ISO.
Cameras today can change their ISO on the fly whereas we used to have to change film. Higher ISO is better for dark scenes and lower is better for brighter scenes but for the most part use the lowest ISO you can get away with as the lower the ISO the better the quality. Auto ISO is pretty good here.
Next is shutter speed. The general rule is that to “freeze” motion you use a short or high shutter speed (the actual rule is the reciprocal of the lens is the safe shutter speed to handhold the lens thus 1/250th of a second to safely hold a 200mm lens and 1/30th of a second to safely hold a 28mm lens). This has changed by the fact that many cameras and lenses have “Image Stabilization” so we’re not going to worry about that rule really. What is more important is understanding what the shutter speed will do for you. A fast shutter speed will freeze something but that’s often boring unless there’s some real compelling reason to freeze it. Better is to choose a shutter speed that will impart some blur to the shot and keep your subject sharp. For motorcycles that shutter speed is generally between a 1/30th and 1/125th. Don’t expect all your shots to come out but with practice you’ll get better. “Panning” is the technique of following your subject and shooting as you follow. The subject stays sharp and the background blurs and you create energy and a sense of speed. I find that not looking through the camera but looking over it and turning your body to match the speed of the subject is more accurate - sorta like shooting a gun you need to “be” your target.

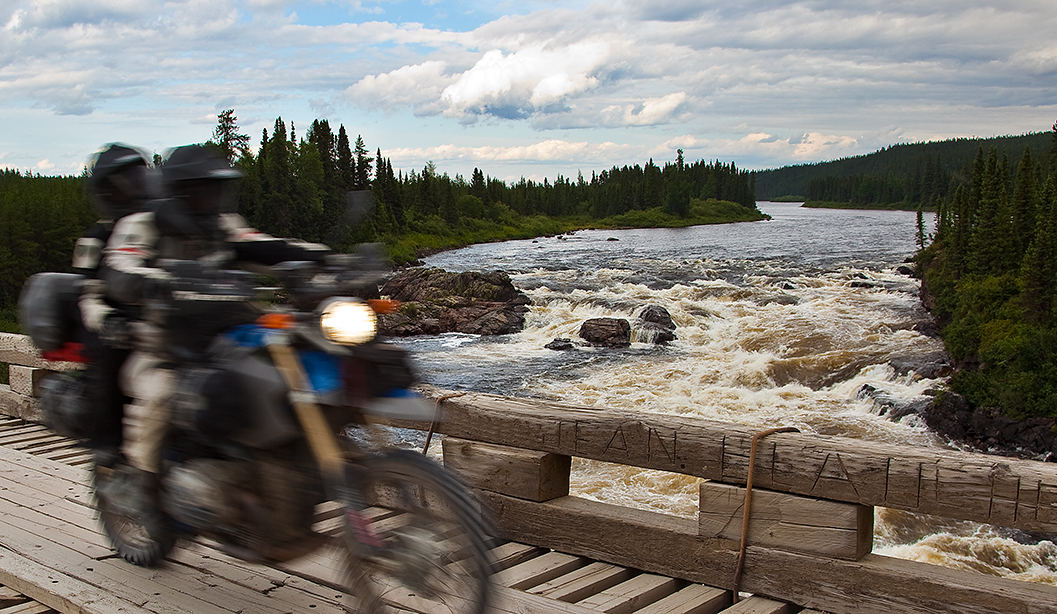
The flip side is that sometimes letting your subject blur is good and helps to tell the story. these’s two shots that show both aspects of blur - the first is Gino doing a wheelie and I panned with the shutter at 1/125th and the next is Gino and Lauren going over a bridge and I kept the camera still with a shutter of 1/45th of a second. Both impart motion in different ways and tell different stories.
Aperture next.
Aperature controls the amount of things that are in focus. The lower the number (f2.0 or f2.8) the less things are in focus and the higher the number the more things are in focus. Geeks use the word Bokah to describe this and it’s a good way to figure out if someone is a photo geek. Like shutter speed the tendency is to go for more (in focus) but like shutter speed and most things in life less is more. The less things are in focus the more you concentrate on the thing that is in focus. It can also add some depth to a photo. Here's an outtake of Lauren doing the dishes with a wide lens and a lot of stuff in focus. It's good at giving a sense of place but not really of Lauren.
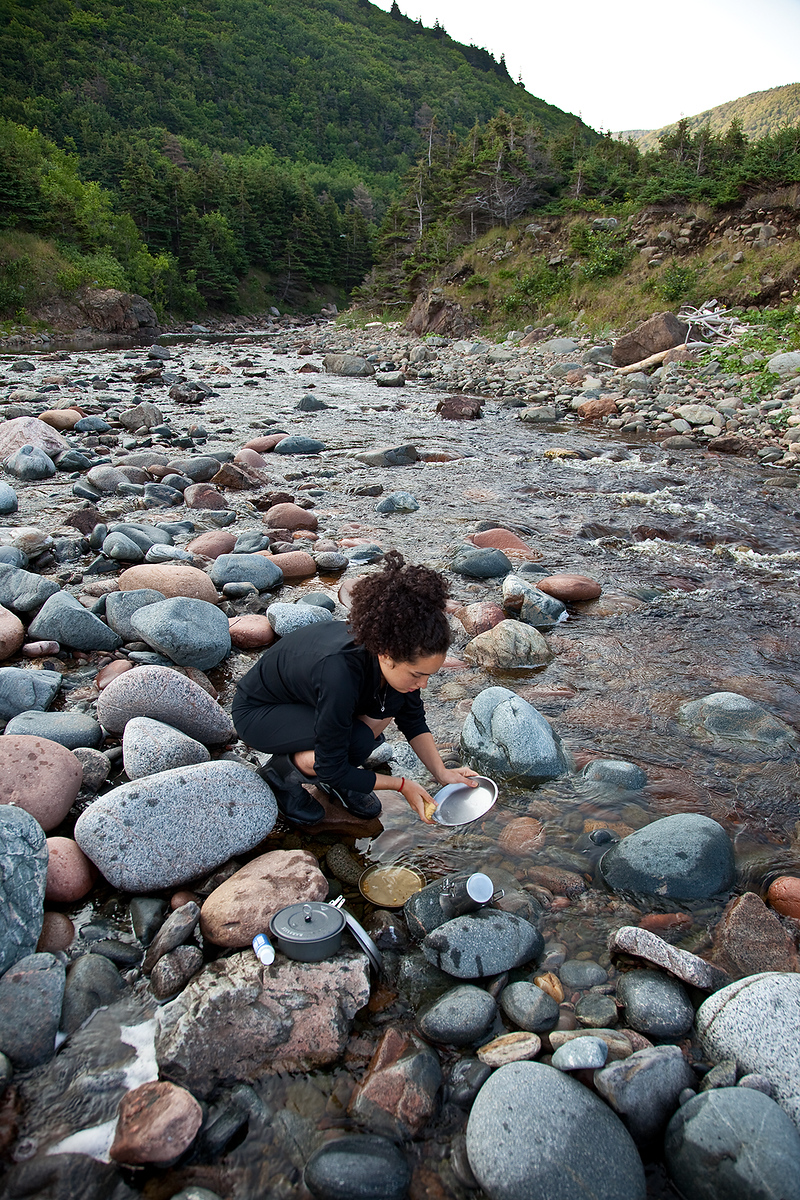
Here's the shot I chose which is more Lauren and less place. There's enough to give you a sense of the river but it's more about Lauren.

You’re eye is constantly changing focus as it looks at things so putting something in focus is a way of saying, “look at this for a moment”. Of course aperture and shutter speed are tied together: more things in focus equals less shutter speed and more shutter speed equals less in focus which, if you think about it, works out nicely. If you’re trying to go for a blur it’s nice to know that you’ll have more in focus so you won’t have to worry about it as much. If you’re trying to freeze motion it can be enhanced with a shallow depth of field. You can read about this stuff in photo books but for the most part it’s enough to know which does what and then set the camera in the way to get what you want.
So that’s a bunch of the technical stuff which, if you really wanted to just ignore, you could by letting the camera do it’s fully automatic thing. God bless technology. So now lets deal with some basic stuff that the camera can’t do: choosing, composing and timing.
Choosing is just that - what are you shooting? For our purposes it’s most likely friends and motorcycles. Here’s where technology deals us a blow we don’t even realize. Zoom lenses. More specifically telephoto zoom lenses. They’re pretty evil things that do more harm then good just like a monster engine - powerful in the right hands but more often abused to no end and probably hurting your end result. If you don’t believe me look at the slow guys at a track day - R1’s and Hayabusas. If you want to ride fast learn on a small bike and if you want to be a good photographer don’t use wacky or extreme lenses as a crutch. Ages ago when I was in college I owned every Nikon lens made and was a huge gear geek (those that know me will say I’m still a geek). Once on an assignment I had an editor go over my contact sheets, “Hmm, you’ve got a 300mm eh? and a 20mm too?” Yes, I did I said proudly. “How about trying something in the middle?” he offered?
His advice stung but also hit home. The worlds best zoom is your feet. Use them. The more extreme the lens the less the shot is about your subject and the more it’s about the gear you’re using. Lenses near “normal” are more like your natural eye. Which leads to the next bit of advice - personal space.
About how far away do you find you are when you have a conversation with someone? A lot depends on your relationship with them right? The garbage man? 10-15 feet. A coworker? 6-10’. A good friend? 3-6’ and a lover 0-3’. Think about that. The same photo editor gave me the advice to use my feet to get closer and get into that personal space and not rely on lenses. It’s harder than you might think too and that’s part of the skill of a journalist; to get into a person’s personal space and communicate their story intimately. Getting closer will change the way you take photos in a fundamental way and for the better - this I can promise you. Here I'm about 3' away.

If you want to learn about something what do you do? You get closer. How do you learn to weld? From across the room or from 12” away? If you want to show something try getting closer. When you start to get uncomfortably close get a little closer and see what happens. It holds true for photographing food, people, engines or just about anything.
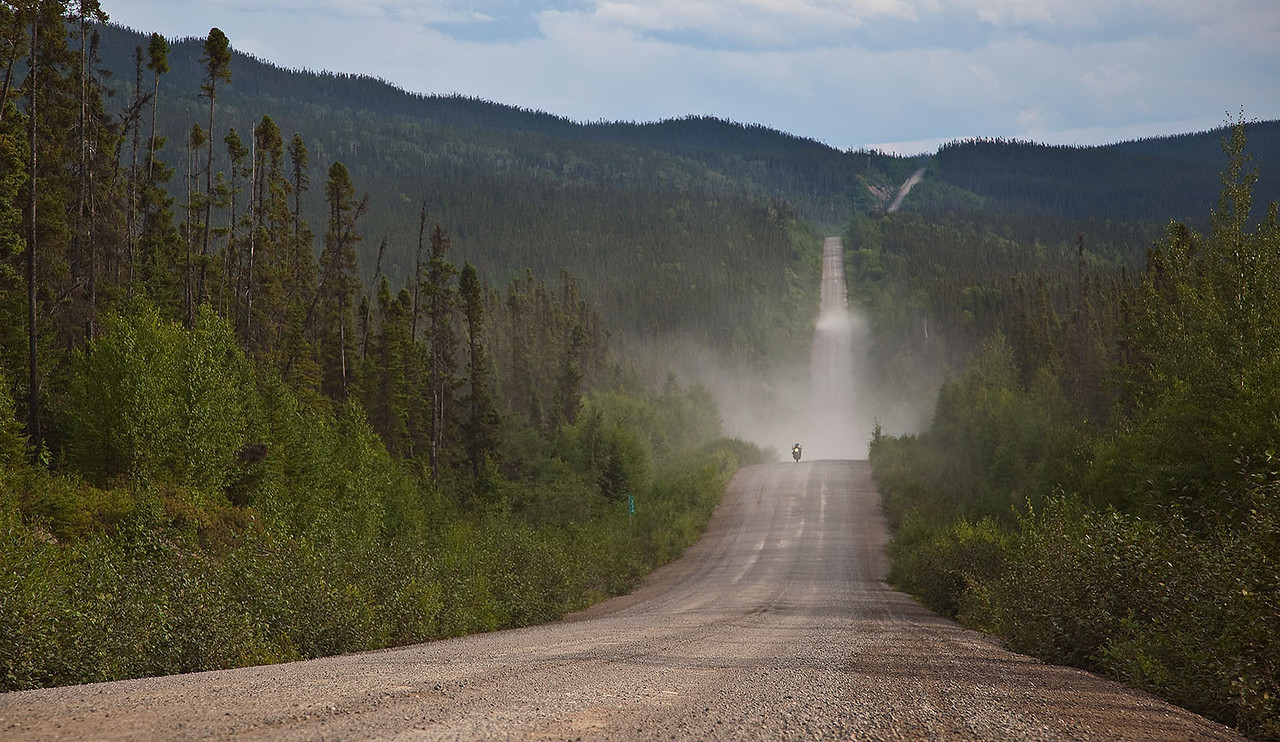
There's also a place for telephotos. They compress space and that can help sometimes to communicate a feeling. Here's a shot of the road with a 24mm wide lens:

Nice but you don't have the same sense of the largeness of the road as you do from the same point shot with a short telephoto of 105mm:
So closer is better but not always. Anytime you describe something or write about something you need to start with an overall description - something that sets the scene or gives a sense of the space. For this you need to step back a bit. Maybe way back. Again, you’re feet will do a better job than a lens here so if you want to show an amazing campsite or a fantastic road strap on the boots and start hiking or climbing. Here's a shot of our camp from camp:
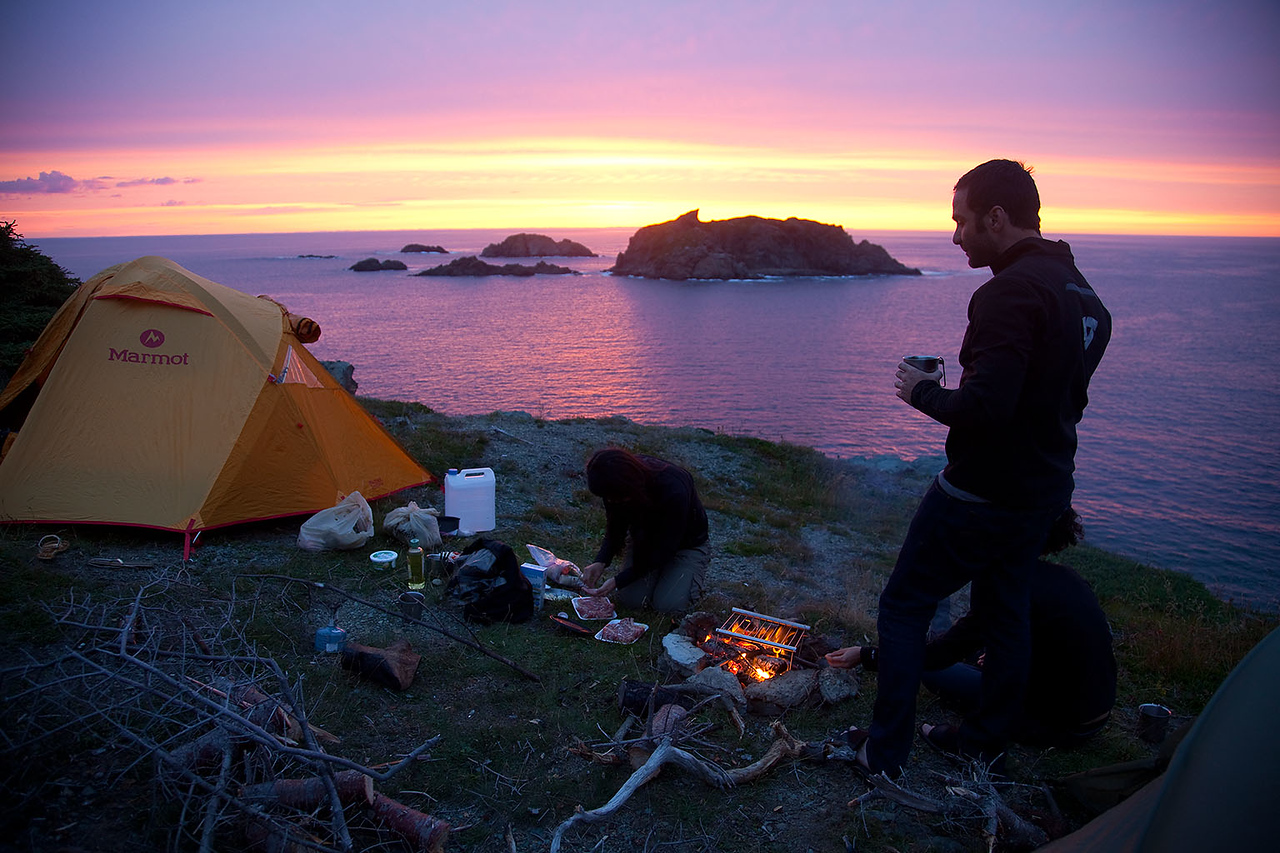
And here I hiked a little ways above our campsite to get this expansive view:
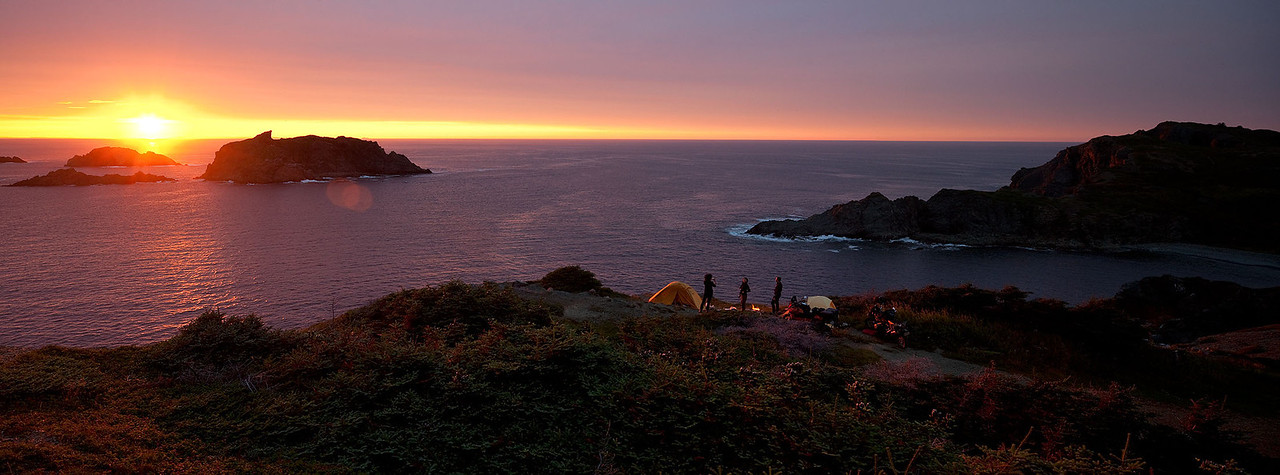
Both nice but the last one is a bit more breathtaking because of the scale you can sense.
So the next bit is actual in-the-viewfinder advice and that is composition. The most basic advice and the age old rule is the Rule of Thirds. Divide your frame up with a pair of imaginary lines across and down. Like this:
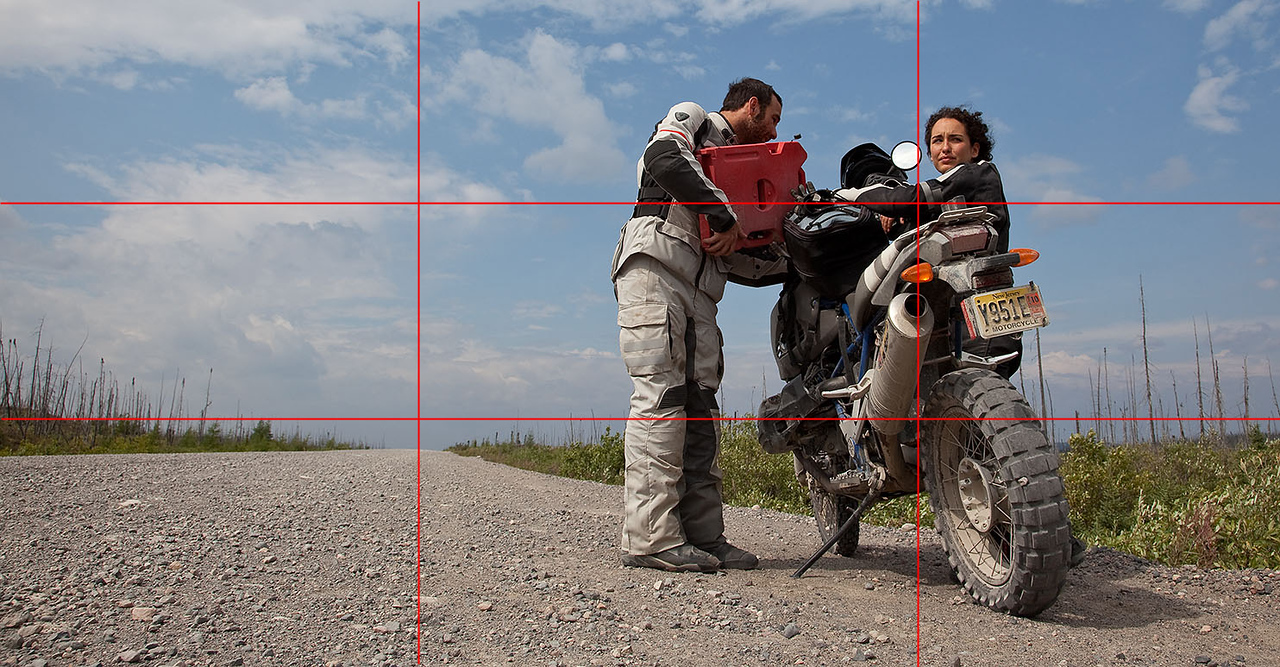
The entire idea here is to avoid putting things in the middle but on the intersections of the thirds. This comes from the Japanese idea of wabi sabi. Things in balance or symmetrical have no tension or rhythm and so lack interest. Just like Rossi winning a race because he found a good rhythm or a song you can’t stop listening to because it draws you in we are creatures that respond to rhythm and subject-in-the-middle photography has no rhythm, no interest. You don’t have to follow the “rule of thirds” but it’s a good place to start and work from. Anything that keeps the horizon from being in the center or the subject dead in the middle is a good thing.
Finally there’s timing. I think everyones idea of timing related to photography is capturing perfect high speed action but but the sort of timing I’m talking about is more the Henri Cartier-Bresson sort. He coined the term “the decisive moment” and it’s more about capturing a moment that tells a story than about an action. Many times it’s the moment before or after something happens that are the most telling. I was trying to capture the dust that the trucks were making and how miserable it was and I was shooting a semi as it passed while we were filling Gino’s bike and even though the truck passed I kept the camera up and kept shooting as the wave of dust hit seconds later and captured Lauren’s reaction as she put her head down and covered her eyes. That actually helped convey the misery of the dust we were experiencing more than the truck passing.
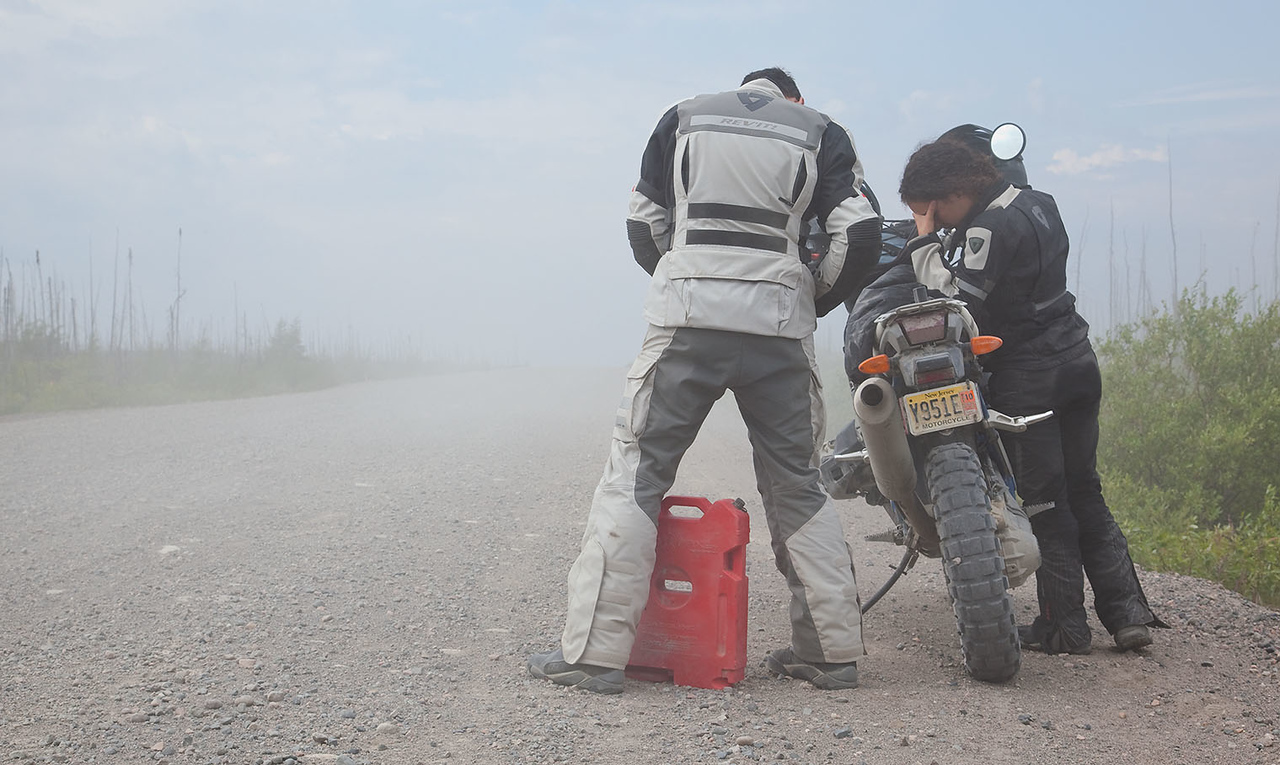
So when you’re shooting something look for that moment before and after to help tell the story. A rider poised to drop into a raging river might have more tension than when they actually ride into it because you can’t tell if it’s inches or feet deep and that uncertainty is more unsettling.
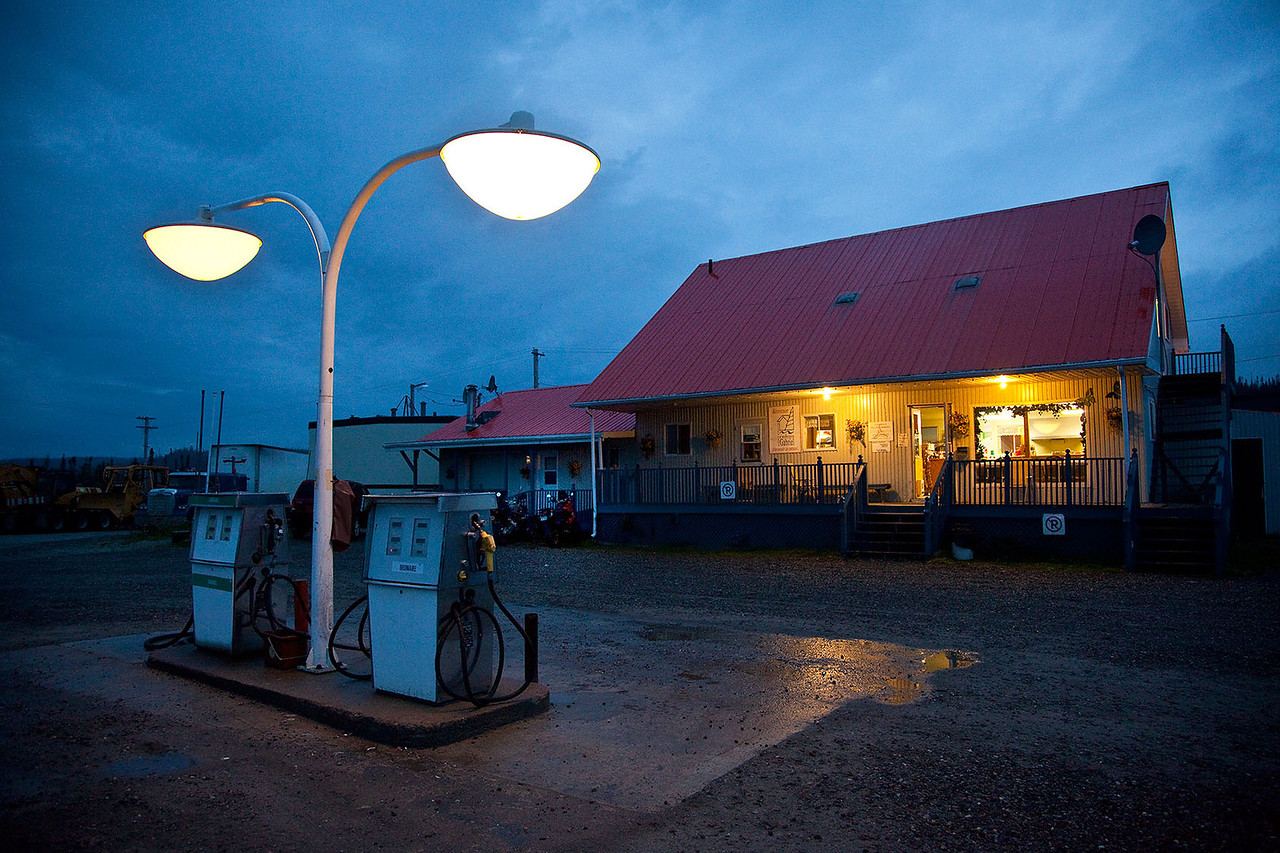
It’s also sometimes just about the time of day. Noon is sort of miserable light as it's high above and makes for hard dark shadows. Dusk or dawn are the "magic" hours when light is soft and warm. When we got to Relais Gabriel I shot some shots of the cafe but they, frankly, sucked.
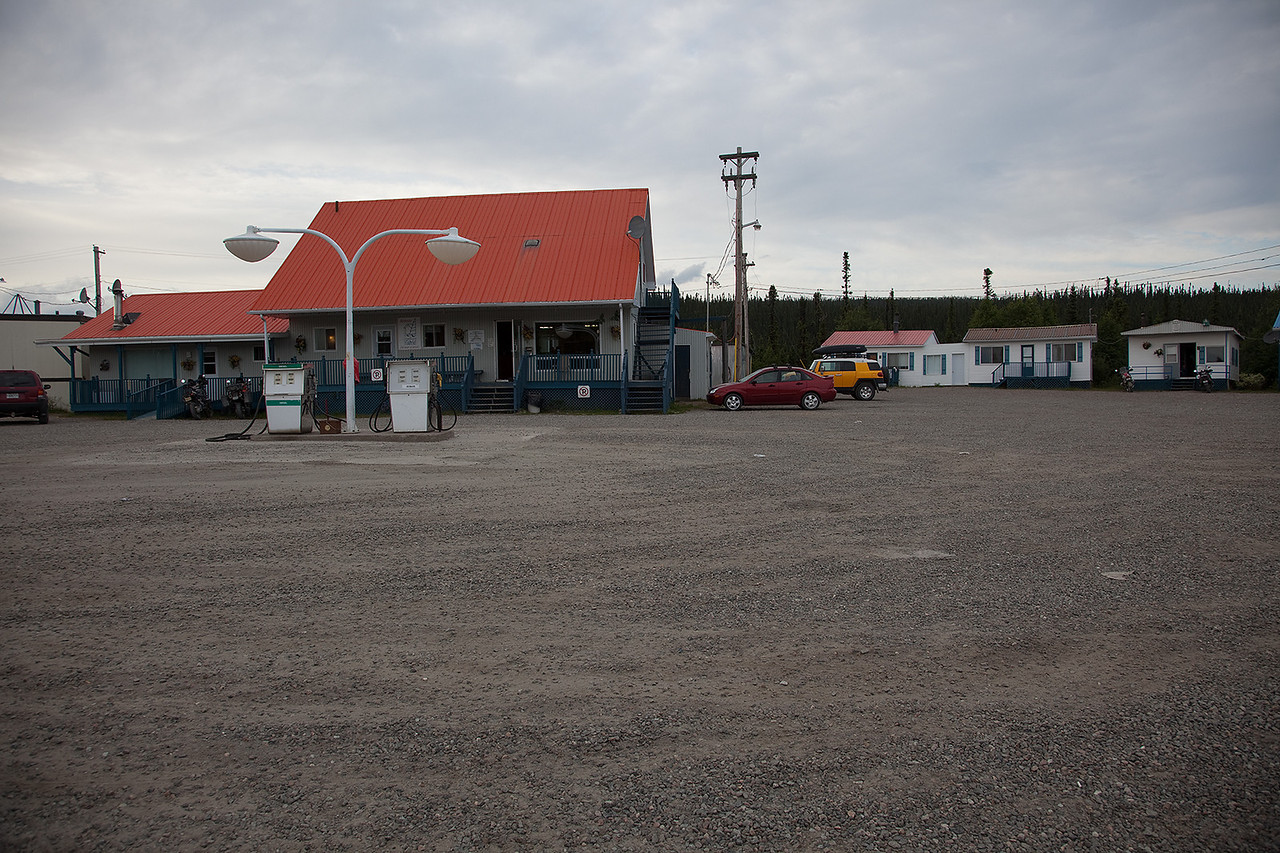
I tried at dusk too but it still didn't do it for me.

At dawn it had rained and I shot some photos while the lights were still on before the sun came up. The lights of the cafe mixed with the available light and finally made a nice shot:
So that’s a few tips to help you on your own photography. I think this site has some pretty talented photographers and I regularly use it for ideas and inspiration. Part of what makes it good is that, unlike a photo geek site, people here care about what they’re shooting and that goes a long way toward making a better photo right there. The days of film are long gone and memory is cheap so the best advice I can give is to shoot a lot and try different things. Get down on your knees, climb on top of the van and wait for that decisive moment and then shoot like hell and edit later.
f8 and be there!
Gregor
https://www.advrider.com/forums/showpost.php?p=10785151&postcount=274
So I’ve gotten a lot of compliments and a few PM’s about my photography and I really appreciate it. I’ve been a professional photographer for my whole life and I still love the craft as there’s always something to learn. A lot have asked for advice or a book or primer to help with your own photography and while I don’t know of a good book I can offer some basic advice so here you go:
Photography is a lot like comedy and real estate: location, location, location and...
...timing!
Okay that's true but more than anything the point of photography is to tell a story. Story telling is how we communicate our world or our experience and stories can be told many ways; simply, as fiction, with great embellishment or to just get the point across. Photography is the same.
Just like a story the fundamentals are sort of important but once mastered become rather automatic. Spelling or the lack of it can really hamper a story not because of a “rule” but because it ruins the rhythm of a sentence. The equivalent is exposure for photography. The good news, like spell check, is that the current cameras, for all intents and purposes, take care of this for you. It’s a misconception that pros hate auto exposure - when we can use it we do. As an example I shot this whole trip on “program” with few exceptions.
The next most basic thing after exposure is focus which is like grammar - again the cameras take care of this for you but there’s also room for creativity. When I started shooting focus was a difficult technique to master and I used to sit by the side of the road and “follow focus” on cars for hours on end to hone my technique. Now there’s no person that can focus faster or more accurately than the cameras can. Like all technology though you should learn to make it work for you rather than against you. All cameras have a mode that allows you to half press to lock the focus on the center and then hold that half press and recompose - learn that trick and use it or even better just try manual for a while.
If your camera has the ability to vary the aperture and shutter speed this allows a lot of control and creativity. Three elements control focus and exposure. Aperture is the opening of the lens and controls how much things are in focus - a lot or a little. Shutter speed is the length of time the shutter is open and also controls the amount of blur. ISO is the sensitivity to light of the camera and the three are intertwined so that each one affects the other. You don’t have to know a lot about them but a little will help. First let’s look at ISO.
Cameras today can change their ISO on the fly whereas we used to have to change film. Higher ISO is better for dark scenes and lower is better for brighter scenes but for the most part use the lowest ISO you can get away with as the lower the ISO the better the quality. Auto ISO is pretty good here.
Next is shutter speed. The general rule is that to “freeze” motion you use a short or high shutter speed (the actual rule is the reciprocal of the lens is the safe shutter speed to handhold the lens thus 1/250th of a second to safely hold a 200mm lens and 1/30th of a second to safely hold a 28mm lens). This has changed by the fact that many cameras and lenses have “Image Stabilization” so we’re not going to worry about that rule really. What is more important is understanding what the shutter speed will do for you. A fast shutter speed will freeze something but that’s often boring unless there’s some real compelling reason to freeze it. Better is to choose a shutter speed that will impart some blur to the shot and keep your subject sharp. For motorcycles that shutter speed is generally between a 1/30th and 1/125th. Don’t expect all your shots to come out but with practice you’ll get better. “Panning” is the technique of following your subject and shooting as you follow. The subject stays sharp and the background blurs and you create energy and a sense of speed. I find that not looking through the camera but looking over it and turning your body to match the speed of the subject is more accurate - sorta like shooting a gun you need to “be” your target.
The flip side is that sometimes letting your subject blur is good and helps to tell the story. these’s two shots that show both aspects of blur - the first is Gino doing a wheelie and I panned with the shutter at 1/125th and the next is Gino and Lauren going over a bridge and I kept the camera still with a shutter of 1/45th of a second. Both impart motion in different ways and tell different stories.
Aperture next.
Aperature controls the amount of things that are in focus. The lower the number (f2.0 or f2.8) the less things are in focus and the higher the number the more things are in focus. Geeks use the word Bokah to describe this and it’s a good way to figure out if someone is a photo geek. Like shutter speed the tendency is to go for more (in focus) but like shutter speed and most things in life less is more. The less things are in focus the more you concentrate on the thing that is in focus. It can also add some depth to a photo. Here's an outtake of Lauren doing the dishes with a wide lens and a lot of stuff in focus. It's good at giving a sense of place but not really of Lauren.
Here's the shot I chose which is more Lauren and less place. There's enough to give you a sense of the river but it's more about Lauren.
You’re eye is constantly changing focus as it looks at things so putting something in focus is a way of saying, “look at this for a moment”. Of course aperture and shutter speed are tied together: more things in focus equals less shutter speed and more shutter speed equals less in focus which, if you think about it, works out nicely. If you’re trying to go for a blur it’s nice to know that you’ll have more in focus so you won’t have to worry about it as much. If you’re trying to freeze motion it can be enhanced with a shallow depth of field. You can read about this stuff in photo books but for the most part it’s enough to know which does what and then set the camera in the way to get what you want.
So that’s a bunch of the technical stuff which, if you really wanted to just ignore, you could by letting the camera do it’s fully automatic thing. God bless technology. So now lets deal with some basic stuff that the camera can’t do: choosing, composing and timing.
Choosing is just that - what are you shooting? For our purposes it’s most likely friends and motorcycles. Here’s where technology deals us a blow we don’t even realize. Zoom lenses. More specifically telephoto zoom lenses. They’re pretty evil things that do more harm then good just like a monster engine - powerful in the right hands but more often abused to no end and probably hurting your end result. If you don’t believe me look at the slow guys at a track day - R1’s and Hayabusas. If you want to ride fast learn on a small bike and if you want to be a good photographer don’t use wacky or extreme lenses as a crutch. Ages ago when I was in college I owned every Nikon lens made and was a huge gear geek (those that know me will say I’m still a geek). Once on an assignment I had an editor go over my contact sheets, “Hmm, you’ve got a 300mm eh? and a 20mm too?” Yes, I did I said proudly. “How about trying something in the middle?” he offered?
His advice stung but also hit home. The worlds best zoom is your feet. Use them. The more extreme the lens the less the shot is about your subject and the more it’s about the gear you’re using. Lenses near “normal” are more like your natural eye. Which leads to the next bit of advice - personal space.
About how far away do you find you are when you have a conversation with someone? A lot depends on your relationship with them right? The garbage man? 10-15 feet. A coworker? 6-10’. A good friend? 3-6’ and a lover 0-3’. Think about that. The same photo editor gave me the advice to use my feet to get closer and get into that personal space and not rely on lenses. It’s harder than you might think too and that’s part of the skill of a journalist; to get into a person’s personal space and communicate their story intimately. Getting closer will change the way you take photos in a fundamental way and for the better - this I can promise you. Here I'm about 3' away.
If you want to learn about something what do you do? You get closer. How do you learn to weld? From across the room or from 12” away? If you want to show something try getting closer. When you start to get uncomfortably close get a little closer and see what happens. It holds true for photographing food, people, engines or just about anything.
There's also a place for telephotos. They compress space and that can help sometimes to communicate a feeling. Here's a shot of the road with a 24mm wide lens:
Nice but you don't have the same sense of the largeness of the road as you do from the same point shot with a short telephoto of 105mm:
So closer is better but not always. Anytime you describe something or write about something you need to start with an overall description - something that sets the scene or gives a sense of the space. For this you need to step back a bit. Maybe way back. Again, you’re feet will do a better job than a lens here so if you want to show an amazing campsite or a fantastic road strap on the boots and start hiking or climbing. Here's a shot of our camp from camp:
And here I hiked a little ways above our campsite to get this expansive view:
Both nice but the last one is a bit more breathtaking because of the scale you can sense.
So the next bit is actual in-the-viewfinder advice and that is composition. The most basic advice and the age old rule is the Rule of Thirds. Divide your frame up with a pair of imaginary lines across and down. Like this:
The entire idea here is to avoid putting things in the middle but on the intersections of the thirds. This comes from the Japanese idea of wabi sabi. Things in balance or symmetrical have no tension or rhythm and so lack interest. Just like Rossi winning a race because he found a good rhythm or a song you can’t stop listening to because it draws you in we are creatures that respond to rhythm and subject-in-the-middle photography has no rhythm, no interest. You don’t have to follow the “rule of thirds” but it’s a good place to start and work from. Anything that keeps the horizon from being in the center or the subject dead in the middle is a good thing.
Finally there’s timing. I think everyones idea of timing related to photography is capturing perfect high speed action but but the sort of timing I’m talking about is more the Henri Cartier-Bresson sort. He coined the term “the decisive moment” and it’s more about capturing a moment that tells a story than about an action. Many times it’s the moment before or after something happens that are the most telling. I was trying to capture the dust that the trucks were making and how miserable it was and I was shooting a semi as it passed while we were filling Gino’s bike and even though the truck passed I kept the camera up and kept shooting as the wave of dust hit seconds later and captured Lauren’s reaction as she put her head down and covered her eyes. That actually helped convey the misery of the dust we were experiencing more than the truck passing.
So when you’re shooting something look for that moment before and after to help tell the story. A rider poised to drop into a raging river might have more tension than when they actually ride into it because you can’t tell if it’s inches or feet deep and that uncertainty is more unsettling.
It’s also sometimes just about the time of day. Noon is sort of miserable light as it's high above and makes for hard dark shadows. Dusk or dawn are the "magic" hours when light is soft and warm. When we got to Relais Gabriel I shot some shots of the cafe but they, frankly, sucked.
I tried at dusk too but it still didn't do it for me.
At dawn it had rained and I shot some photos while the lights were still on before the sun came up. The lights of the cafe mixed with the available light and finally made a nice shot:
So that’s a few tips to help you on your own photography. I think this site has some pretty talented photographers and I regularly use it for ideas and inspiration. Part of what makes it good is that, unlike a photo geek site, people here care about what they’re shooting and that goes a long way toward making a better photo right there. The days of film are long gone and memory is cheap so the best advice I can give is to shoot a lot and try different things. Get down on your knees, climb on top of the van and wait for that decisive moment and then shoot like hell and edit later.
f8 and be there!
Gregor